
 Deutsch
  English
 Tips & Tricks Teil 2
- QUICS - Eine Übersicht
- Installing a QNX 4 Network englisch
- Setting up PCMCIA for QNX englisch
QUICS
Eine Übersicht
Index
- Was Sie schon immer über QUICS wissen wollten.
- Wie komme ich in den Genuß von QUICS?
- Wie melde ich mich bei QUICS an?
- Welche Optionen stehen mir in QUICS offen?
- Ich sehe nur ein paar NewsGroups, wo sind die anderen?
- Kann ich die News auch offline lesen?
- Wie kann ich mit tin posten und wie...?
- Auf was sollte ich in QUICS achten?
- Wie sieht die QUICS Verzeichnisstruktur aus?
- Auf was muß ich sonst noch achten?
- Was ist mit den Beta Programmen?
- Wie war das noch mal mit den Service-Plänen?
- Was ist mit ... und mit ... und denn war da noch?
1. Was Sie schon immer über QUICS wissen wollten.
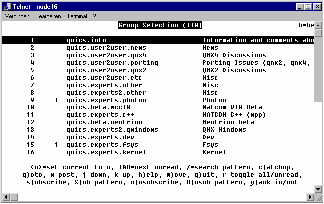 Telnet Session über Win95 und tin der QUICS News Reader. |
Tag für Tag erhält das SWD-Team Anfragen zum Thema QUICS. Häufig gestellte Fragen sind: Was ist QUICS, wie erreiche ich QUICS oder wie funktioniert QUICS. Aus diesem Grunde reichen wir Ihnen diese kleine Hilfe als Orientierung in die Hand. Wir hoffen, daß wir damit einen großen Teil Ihrer Neugier Genüge tun. Doch nun lassen Sie uns zum Wesentlichen kommen. Mit QUICS haben Sie die Möglichkeit, in einem der größten Informationspools hinsichtlich QNX, stöbern zu können. Mit über 100 verschiedenen NewsGroups und der gleichen Anzahl an unterschiedlichen Themen steht Ihnen ein unglaubliches Vermögen an Wissen zur Auswahl. Fragen oder gefragt werden heißt das Motto. Wenn Sie ein Problem haben, stellen Sie es einfach in die entsprechende NewsGroup. Dort werden Ihnen einer der vielen Experten aus der ganzen Welt, aber auch die QNX-Profis selbst, mit Rat und Tat zur Seite stehen. Natürlich können Sie selbst auch Fragen beantworten und somit zur stetig steigenden Qualtität von QUICS beitragen. Bitte haben Sie Verständnis dafür, daß wir nicht auf technische Details, wie das Konfigurieren des Modems oder Probleme mit dem Internetzugang, eingehen konnten, da es den Rahmen dieser Übersicht sprengen würde. Wie auch immer, wir hoffen Ihnen ein wenig mit diesem Dokument helfen zu können.
Viel Spaß beim QUICSEN wünscht Ihnen
Ihr SWD-Team.
2. Wie komme ich in den Genuß von QUICS?
Wenn Sie ein Modem oder eine ISDN-Karte haben und bei einem Internet-Provider registriert sind, haben Sie keine Probleme ins Wunderland der Informationen zu gelangen. Des weiteren sollten Sie TCP/IP für Ihr Betriebssystem installiert haben. Nun können Sie sich bequem per Telnet oder FTP bei QUICS einloggen. Als Alternative bietet sich auch die QSSL- oder unsere SWD-Webpage zum sammeln von Informationen an.Lassen Sie sich überraschen von den Möglichkeiten die Ihnen QUICS bieten kann. Im Kurzen ein kleiner Überblick zum Erreichen von QUICS:
telnet:
telnet quics.qnx.com: Benutzen Sie telnet zum Lesen der NewsGroups. Sie werden aufgefordert, Ihre UserID und Ihr Paßwort einzugeben. Siehe: Einrichten des Anwenderkontos.
FTP:
ftp ftp.qnx.com: Benutzen Sie ftp zur Dateiübertragung. Die Anforderung der UserID und Ihres Paßwortes werden benötigt. Sie können auch auf das Verzeichnis /usr/free und /usr/free2 mit "anonymous" Login zugreifen.
WorldWideWeb:
www.qnx.com: Besuchen Sie die QNX-Webpage und laden Sie freie Software herrunter. Mit jedem Browser haben Sie vollen Zugriff. Sie können leider noch nicht Daten vom /updates Verzeichnis von der Webpage laden. Die NewsGroups sind ebenfalls nicht über die Internetseite zu erhalten.
3. Wie melde ich mich bei QUICS an?
Die Anmeldung bei QUICS ist recht unproblematisch. Öffnen Sie eine Telnet Session wie folgt:Von QNX aus müssen Sie die Option "-8" angeben, um den 8 Bit Modus zu aktivieren.
telnet -8 qnx.com (telnet)
ftp ftp.qnx.com (ftp)
Von Windows, Linux, OS/2 oder sonstigen Betriebssystemen:
telnet qnx.com (telnet)
ftp ftp.qnx.com (ftp)
Wenn die Verbindung aufgebaut ist, sollten Sie einen Begrüßungstext und ein Login bekommen. Lassen Sie uns die Anmeldung im einzelnen etwas näher betrachten.
login:
Geben Sie bitte "newuser" ein, wenn Sie sich zum ersten Mal einloggen.
Your first name?
Bitte geben Sie Ihren Vornamen ein.
Middle initial?
Hier Ihren Zweitnamen oder Kosename.
Last name?
...der Nachname bitte...
Company name?
...der Firmenname.
Title?
Und zu guter letzt, Ihre Firmenposition.
Nachdem für Sie eine UserID gewählt wurde, werden Sie aufgefordert ein Paßwort einzugeben.
New passwd:
Bitte Ihr Paßwort eingeben.
Retype new passwd:
Das Paßwort zur Kontrolle nochmals wiederholen.
Als nächstes wird der Profile Editor gestartet. Hier werden alle benötigten Optionen während einer QUICS Session verwaltet.
Profile Editor
--------------
1.) ditor (Default: vi)
2.) erminal Type (Default: qnx)
3.) eight (25)
4.) idth (80)
5.) ownland Command (Default: qcp se)
6.) pload Command (Default: qcp re)
7.) ast Updated (197001010000.00)
8.) oin a service plan
9.) erial Numbers
10.) uit
Your choice?
1.) Hier können Sie aus einer Reihe Editoren wählen, z.B. qed, vi, vedit, jove, crisp oder pico.
2.) Eine große Auswahl von Möglichkeiten. Wählen Sie selbst.
3.) Darstellungshöhe im Textmodus.
4.) Darstellungsweite im Textmodus.
5.) Erklärt sich von selbst.
6.) Erklärt sich von selbst.
7.) Erklärt sich von selbst.
8.) Nutzen Sie die Möglichkeit eines Serviceplans ( später mehr ).
9.) Hier können Sie Ihre Seriennummern von Ihren gekauften QNX-Produkten eingeben und dann werden Ihnen die entsprechenden Groups freigeschaltet. ( Sie benötigen jeweils nur eine Seriennummer pro Produkt )
10.) Den Profile Editor verlassen.
Nach dem Verlassen des Profile Editors werden Sie nach Ihrem Login gefragt. Der setzt sich zusammen aus dem jeweils ersten Buchstaben Ihres Vornamens, den Zweitnamen und Ihres Nachnamens. Zum Beispiel:
Willi Otto Petersen wopetersen
Willi Petersen wpetersen
Jetzt müssen Sie noch Ihr Paßwort1 eingeben und nun sollten Sie, wenn alles gut gegangen ist, ein Prompt bekommen: "$".
4. Welche Optionen stehen mir in QUICS offen?
Nachdem Sie jetzt in QUICS sind, fragen Sie sich bestimmt, was Sie hier alles machen können. Zum einen können Sie die NewsGroups besuchen. Des weiteren können Sie sich die neuesten Betas (später mehr) bzw. Updates downloaden. Die Freesoftware Verzeichnisse bieten Ihnen eine große Auswahl an Treibern, Tools und anderer nützlicher Software. Wie Sie bestimmt schon gemerkt haben, befinden Sie sich in einer normalen UNIX-Shell. Die Standard UNIX-Kommandos sind also gültig. Um in die NewsGroups zu gelangen, sollten Sie "tin" benutzen. "tin" ist ein recht gebräuchlicher NewsReader. Wenn Sie "tin" aufgerufen haben, können Sie sich mit der Option "h" die Online-Hilfe aufrufen. Dort wird Ihnen erklärt wie Sie und was Sie mit dem NewsReader so machen können.5. Ich sehe nur ein paar NewsGroups, wo sind die anderen?
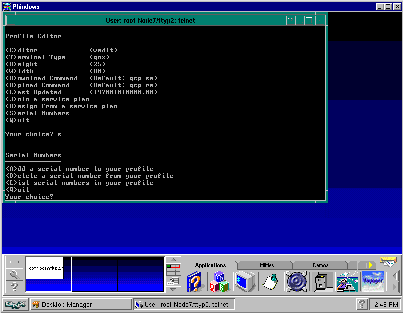 Der Profile Editor. |
Mit der Taste "S" gelangen Sie in die Online Registrierung. Wenn Sie Ihre QNX Produkte eingetragen haben, werden Ihnen die entsprechenden NewsGroups freigeschaltet. Sie finden die Registrierungsnummern auf der Rückseite Ihrer Installationsdisketten.
6. Kann ich die News auch offline lesen?
Wenn Sie beim Lesen der News nicht unbedingt online sein wollen, können Sie die NewsGroups auch auf Ihren lokalen Rechner downloaden und mit einem Offline-Reader schmökern. Den Offline-Reader erhalten Sie unter /usr/free/QUICS/slnr-src.tgz. Wie Sie die NewsGroups für Ihren Offline-Reader downloaden, finden Sie in der entsprechenden Dokumentation unter /usr/quics/ docs/offline.doc und unter /usr/quics/ docs/offline.news.doc.7. Wie kann ich mit tin posten und wie...?
Nun erwähnen wir immer wieder tin und Sie haben sicher schon einige Fragen zu diesem Thema. Zum Beispiel wie man Messages posten kann, oder wie dieses und jenes in tin funktioniert. Deshalb wollen wir Ihnen in einer kurzen Übersicht die wichtigsten Kommandos von tin erläutern. Wenn Sie mit tin etwas experimentieren wollen, so steht Ihnen die NewsGroup "quics.info.test" zur Verfügung. Hier nun die Kurzübersicht der Kommandos:Wenn keine Gruppen markiert sind:
lese die markierte Gruppe
gehe zur nächsten Gruppe mit ungelesenen Artikeln
c markiere die Gruppe als gelesen
g wähle neue Gruppe als gelesen
j eine Zeile weiter runter
k eine Zeile weiter rauf
hH Kommando Hilfe ( H wechselt zum Mini - Hilfemenü )
qQ verlassen
r wechseln zur Ansicht aller Beiträge der Gruppen
s Beitrag zur Gruppe
u den Beitrag zurücknehmen aus der Gruppe
w posten an einen Artikel in der Gruppe
W listet alle geposteten Artikel der Benutzer
y herausziehen aller Beiträge aus .newsrc
z markiere die Gruppe als ungelesen
Wenn eine Gruppe markiert ist:
den Artikel lesen
gehe zum nächsten ungelesenen Artikel
forwarden einer Seite
hH Kommando Hilfe (H wechselt zum Mini - Hilfemenü)
j eine Zeile weiter runter
k eine Zeile weiter rauf
m mailen article/thread/hot/pattern/tagged articles
q zurück zum vorherigen Level
Q verlassen
r wechseln der Ansicht zwischen allen Artikeln und ungelesen Artikeln
s sichern in article/thread/tagged/ articles in Datei
t markiere Artikel zum crossposting/mailing/saving
U alle Markierungen der Artikel rückgängig machen
w posten eines Artikels zur Gruppe
Wenn ein Artikel gerade gelesen wird:
gehe zur nächsten Antwort
gehe zum nächsten ungelesenen Artikel
forwarden der Seite
D löschen (Abbrechen) des Artikels
fF nachfolgend Antworten ("f" den Text kopieren)
hH Kommando Hilfe (H wechselt zum Mini - Hilfemenü)
m mailen article/thread/hot/pattern/tagged articles
q zurück zum vorherigen Level
rR dem Autor antworten ("r" Text kopieren)
s sichern in article/thread/tagged/ articles in Datei
w posten eines Artikels zur Gruppe
W Listet alle geposteten Artikel der Benutzer
x zu einer anderen Gruppe posten
zZ markiere die Gruppe als ungelesen
("Z" Antworten)
8. Auf was sollte ich in QUICS achten?
Dieser Abschnitt soll Sie in die generellen Richtlinien, wie man in QUICS antwortet und fragt, einweisen. In Anbetracht das täglich mehr als zweihundert Emails in den NewsGroups landen, wäre es von Vorteil wenn Sie den Richtlinien folgen würden, da Sie dann reibungslos bearbeitet werden können.Bevor Sie eine Email versenden
- Lesen Sie zuerst die relevanten Dokumentationen.
- Prüfen Sie in den entsprechenden NewsGroups, ob Ihre Frage nicht vielleicht schon beantwortet worden ist.
- Wenn Sie einem Artikel antworten, löschen Sie den Text aus dem originalen Frageartikel, der nicht für Ihre Antwort relevant ist. Dies ermöglicht dem QUICS - User, Ihren Artikel schneller und leichter zu lesen.
- Halten Sie Ihre Antworten kurz und sachlich. Stellen Sie auch sicher, daß Ihr Artikel von den anderen Teilnehmern gelesen werden kann.
- Stellen Sie sicher, daß Sie Ihre Frage in der richtigen NewsGroup stellen, da Sie nur in der richtigen Group eine Antwort bekommen können.
9. Wie sieht die QUICS Verzeichnisstruktur aus?
An dieser Stelle wollen wir Ihnen eine Kurzfassung der QUICS Verzeichnisstruktur geben, damit Sie sich besser innerhalb von QUICS orientieren können./updates
Dieses Verzeichnis beinhaltet alle "freien" Updates. Nur das Produkt, welches Sie in der Profile registriert haben, steht Ihnen zum Update zur Verfügung. Aus diesem Verzeichnis kann man ebenfalls die Beta - Software downloaden.
/usr/free & /usr/free2
Software in dem Verzeichnis /usr/free steht Ihnen frei zum downloaden. Diese Software kann mit QNX 4 benutzt werden. Sie können auch direkt über die QSSL Homepage die Software downloaden. Jede Datei in diesem Verzeichnis hat eine "readme" Datei. Diese "readme" Datei enthält noch einige Ausführungen zu der jeweiligen Software. Beide "free" Verzeichnisse werden nicht vom technischen Support bedient. Software im/usr/free2 Verzeichnis ist für das QNX 2 Operating System. Das /usr/free2 Verzeichnis kann nicht von der QSSL Homepage gelesen oder geladen werden.
/updates/beta
Nach Vereinbarung eines Beta Vertrages, steht Ihnen dieses Verzeichnis zur Verfügung, um Ihre Beta Software downloaden zu können.
10. Auf was muß ich sonst noch achten?
Bitte achten Sie auf Ihr Home Verzeichnis mit Hinblick auf die Größe Ihrer dort gelagerten Daten. Sollten Sie sich Ihr Home Verzeichnis mit weiteren Benutzern teilen, so geben Sie jedem weiteren Benutzer ein weiteres Unterverzeichnis. Bitte säubern Sie regelmäßig Ihr Home Verzeichnis von überflüssigen Dateien. QSSL nimmt sich die Freiheit, zu jeder Zeit und ohne Vorwarnung, Festplattenspeicherplatz freizumachen. Bitte denken Sie nochmals daran, daß Ihre Daten von jedem Mitarbeiter der Firma QSSL gelesen werden kann. Es handelt sich bei Ihrem Home Verzeichnis um kein "privates" Verzeichnis.11. Was ist mit den Beta Programmen?
Werden Sie Beta-Tester und probieren Sie heute die Software, die Sie vielleicht morgen schon im Einsatz haben. In Zusammenarbeit mit anderen Firmen die Beta-Software im Einsatz haben, den QSSL-Entwicklern und Ihnen, schaffen Sie quallitativ hochwertige Produkte. Die Entwickler sind auf Ihre Erfahrungen aus der Praxis angewiesen, damit Sie auch in Zukunft, praxisnahe Software entwickeln können. Der allgemeine Treffpunkt der Beta-Tester ist in diesem Fall wieder QUICS. Zu jeder Beta-Software steht eine NewsGroup bereit, in der Sie sich mit anderen Testern austauschen können. Sollten Sie Interesse haben, so wenden Sie sich bitte an unser SWD-Team. Wir werden Ihnen dann umgehend entsprechendes Informationsmaterial zur Verfügung stellen. Nach Abschluß des Beta-Testagreements können Sie dann die Software aus QUICS dowloaden.12. Wie war das noch mal mit den Service-Plänen?
Sie sind Entwickler oder arbeiten an einem höchst wichtigen Projekt? Sie sind unbedingt auf brandneue Informationen angewiesen? Bei QUICS liegen Sie genau richtig. Je nach Service Plan, erhalten Sie verschiedene Rechte in QUICS oder besser bei QSSL, von der telefonischen Hotline bis zu umfangreichen Rechten innerhalb von QUICS. Wir wollen Ihnen hier eine kurze Übersicht geben:- Free Service -- Jeder QNX-User bekommt automatisch den Free Support Service. Das heißt Sie können bei der technischen Hotline anrufen, bekommen Zugriff auf QUICS (nur lesen und beschränkte Sicht auf die NewsGroups) und können sich aus QUICS freie Software und Updates downloaden.
- Standard Service -- Der Standard Service Plan beruht im Wesentlichen auf dem Free Service Plan und funktioniert nach dem Verfahren Bezahlen pro Benutzung. Obendrein bekommen Sie Fax-Support, Schreibrechte in QUICS, um technische Fragen zu stellen und Email-Support.
- Gold Service -- Hier stehen Ihnen sämtliche NewsGroups in QUICS zur Verfügung und Sie erhalten auch überall Schreibrechte. Grundsätzlich werden Kunden mit dem Gold Service vorrangig bearbeitet. Für die Gold-Service-Plan-Kunden gibt es eine extra Hotline, (telefonische Anfragen werden innerhalb von 2 Stunden beantwortet). Fax Support und Email Support innerhalb von 24 Stunden.
- Eine Frage in QUICS kostet 2 Punkte
- Email und Fax kosten jeweils 5 Punkte
2.) Standard Service Plan: 50 Punkte oder ein Jahr, 398,00 DM
3.) Frequent User Package: Quasi ein add-on zum Standard Service, aber mit 150 Punkten
998,00 DM
4.) Gold Service Plan: viele Extras und keine Punktbeschränkung. Vorrang vor allen anderen Service-Plänen
9.990,00 DM
Eines haben wir noch vergessen. Das SWD-Support Team. Wir stehen Ihnen selbstverständlich auch zur Verfügung. Unsere QNX-Profis würden sich freuen, Ihnen weiterhelfen zu können. Hier noch einmal unsere technische Hotline:
04106 / 6109 - 51.
13. Was ist mit ... und mit ... und denn war da noch?
Wahrscheinlich haben Sie noch eine Menge Fragen, dennoch bitten wir um Verständnis, daß wir nicht alle beantworten können, da diese Unterlage schon kurz davor ist, den Rahmen einer Übersicht zu sprengen. Es sei nochmals erwähnt, daß dieses Dokument sich in der Hauptsache damit beschäftigt, Ihnen eine kleine Starthilfe und gleichzeitig ein wenig Orientierung in QUICS zu geben. Wenn Sie größere Schwierigkeiten bekommen sollten, können Sie sich jederzeit an uns wenden. Unser Support-Team freut sich, Ihnen weiterhelfen zu können. Alles was uns jetzt noch bleibt, ist Ihnen viel Freude mit QUICS zu wünschen und zu hoffen, daß es Ihnen genauso viel Spaß macht als auch nützt wie uns.Mit freundlichen Grüßen
    Ihr SW Datentechnik Team


Included in this document are the following areas:
Setting up an Initial QNX4 Network
QNX is a network distributed operating system that allows users on any node (with appropriate priveleges) to access any file or device on any other node. This powerful feature is built into the heart of every QNX system but like any system it needs to be configured correctly before it can be fully utilised. This technote will take a step by step approach to setting up a QNX network and give some hints on troubleshooting.
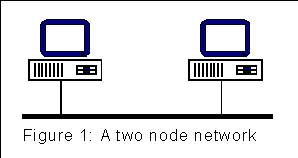
The scenario is that we have two machines onto which we have just installed QNX, using the default installation process. We are going to connect these two machines using an Ethernet network. See Figure 1.
Step 1: Changing node numbers
QNX uses a logical node address so that it can differentiate one computer from any other computer on a network. Each machine is given a number, starting at one and incrementing every time a new machine is added to the network. The default QNX installation makes every computer node 1 and this is fine for all standalone systems. We will need to change one of the machines to recognise itself as node 2.
- Change directory to where the build files are kept:
cd /boot/build
- Copy the existing build file to the new one:
cp hard.1 hard.2
- Edit the new build file to make the changes necessary. You can use whichever editor you feel most at home with but your build file wants to look like this. Only the changes necessary are highlighted.
sys/Proc32
$ 52000 Proc32 -l 2

sys/Slib16
$ 1 Slib16

sys/Slib32
$ 1 Slib32

/bin/Fsys
$ 8000 Fsys

/bin/Fsys.aha7scsi
$ 1000 Fsys.aha7scsi

/bin/mount
$ 1000 mount -p /dev/hd0 /dev/hd0t77 /

/bin/sinit
$ 1000 sinit  TERM=qnx
Save the file and change up one directory:cd ..
- Now we need to build the new boot image. This is the set of instructions that start QNX and tell it how to configure itself:
make b=hard.2
- When this has finished we need to copy the newly created boot file into the correct place and we'll make a backup of the old one just in case things go wrong:
cp /.boot /.altboot
cp images/hard.2 /.boot
- Now we need to copy the system initialisation file to it's new place:
cp /etc/config/sysinit.1 /etc/config/sysinit.2
Step 2: Installing the licenses
This must be done on both machines
Each set of QNX master disks contains an electronic license which is required for the system to operate. In a networked system each machine must have all available licenses so that it 'knows' how many other machines it can talk to. Licenses can only be transferred onto hard disk using the license command. Any attempt to copy, move, rename or back them up will render them useless.
- The licenses are kept on the install disk 1 of the set. Insert the first disk into the drive and, as root, enter:
license
- When prompted change disks and hit enter. When both licenses have been installed press n to finish.
- The licenses are now installed on disk but QNX's in memory database needs to be updated as this is where requests are routed to. To do this:
license -r
- Check that the licenses have been installed and recognised. To do this enter:
sin info
and the output will look like this:Node CPU Machine Speed Memory Ticksize Display Flags 1 586/587 PCI 16629 18504k/31744k 10.0ms VGA Color D3P-----------8P Heapp Heapf Heapl Hands Names Sessions Procs Timers Nodes Boot 29616 27428 5916 32 30 32 150 40 2 Hard at Oct 05 11:28 Locators: 1
If the number in the nodes doesn't match the number of disks that you put in then retry, making sure you use install disk 1. If you still have problems contact your supplier. - Once this has been verified reboot the system so that it will now come up as node2. If the system doesn't come up switch it off and on again and when QNX displays the message:
Press ESC for alternate OS
Quickly hit the ESCAPE key. This will boot the old boot image (the one we copied to /.altboot) and the system will be exactly as it was before so you can go back and carefully review what you did and try to put it right.
Step 3: Configuring the Network
This must be done on both machines
As we have seen QNX supports the idea of a logical network node number. This makes it easier to use than the unwieldy numbers that are used to identify each individual network card. Unfortunately, the network cards are reuired to use these numbers in their communication with each other. We must tell QNX about these numbers and how they correspond with the logical numbers we have given each system.
This is done in the file /etc/config/netmap which looks like this:
one-to-one
What we must do is change this file to relflect our network. We have two machines and two NE-2000 Ethernet cards. Each of these cards has an Ethernet address, written on a sticker somewhere on the card. Ours have the addresses:
02DF1E 012354
02DF1E 013258
So our /etc/config/netmap would look like this:
1	1	02DF1E012354
2	1	02DF1E013258
NOTE:There is a carriage return after the last line.
This tells QNX that we have two nodes, one and two and they are connected via network one (QNX also support more than one network in a machine so we need a way of differentiating those as well.) and how the physical address of the network card corresponds to the logical address we have given each machine.
Step 4: Starting the Network Software
This must be done on both machines
QNX was designed to be a very efficient system and the networking is no exception to this. All of the clever tricks that QNX networking does are performed by the Network Manager, Net. Net doesn't contain any code that accesses hardware, it has a family of device drivers that do that. This keep sthe system as small and efficient as possible by allowing you to only start the network device driver that you need and not have a lot of unused code using valuable system resources.
- Start the Network Manager:
Net &
The ampersand is used to run Net in the background, otherwise it would lock the console up and prevent the user from entering any more commands. - Start the network device driver:
Net.ether1000 -i 10 -v &
The -i 10 tells the driver that the card is configured for Interrupt 10. This is usualy enough for the driver to work out everything else about the card. If it isn't other options can be specified on the command line. Typing:use Net.ether1000
will display the options available.The -v option tells the driver to print out some information about the card as a check that it is running OK. This can be left out.
- Now we have the Network Manager and a device driver running all we need to do is explain to QNX about our network:
netmap -f
The -f tells netmap to read from the file /etc/config/netmap. There are other options to netmap that allow us to manually describe our network or to read the description from another computer running QNX. - Test the network by entering the following command from node 1:
sin -n 2
You should see a list of all proceses running on node2. If it returns withsin: unable to connect to node 2 (No route to host).
then something is wrong. See the section on fault finding for more details. - Add the commands above to the system initialisation file so that they are started every time the machine is switched on.
Adding More Machines
Here we will discuss adding a third machine to the setup described above. Adding a fourth or fifth or hundredth follows exactly the same procedure described here. There are also some shortcuts you can use when the number of machines becomes too unwieldy to update by hand.
We will assume that you have gone through the default installation and have a standalone QNX system running on the new machine.
Step 1: Changing node numbers
This is pretty much the same as configuring for node 2, except you're using a 3. Here it is again to show you exectly what I mean.
- Change directory to where the build files are kept:
cd /boot/build
- Copy the existing build file to the new one:
cp hard.1 hard.3
- Edit the new build file to make the changes necessary. You can use whichever editor you feel most at home with but your build file wants to look like this. Only the changes necessary are highlighted.
sys/Proc32
$ 52000 Proc32 -l 3

sys/Slib16
$ 1 Slib16

sys/Slib32
$ 1 Slib32

/bin/Fsys
$ 8000 Fsys

/bin/Fsys.aha7scsi
$ 1000 Fsys.aha7scsi

/bin/mount
$ 1000 mount -p /dev/hd0 /dev/hd0t77 /

/bin/sinit
$ 1000 sinit  TERM=qnx
Save the file and change up one directory:cd ..
- Now we need to build the new boot image. This is the set of instructions that start QNX and tell it how to configure itself:
make b=hard.3
- When this has finished we need to copy the newly created boot file into the correct place and we'll make a backup of the old one just in case things go wrong:
cp /.boot /.altboot
cp images/hard.3 /.boot
- Now we need to copy the system initialisation file to it's new place:
cp /etc/config/sysinit.1 /etc/config/sysinit.3
Step 2: Installing the licenses
This must be done on all machines
As mentioned before each QNX machine must contain enough licenses for it to be able to communicate with ALL other machines on the network. This means that we must put the new license on nodes 1 and 2 and put all threee licenses on node 3. This is done using the license command. See the earlier notes for exact details.
if you are adding the 20th machine to your network then updating 20 machines and juggling all those disks is a real nightmare. There is a simpler way. Install all 20 licenses on node 20 and put the new license on node 1. From each of the nodes 2 to 19 run the following commands:
license //1/etc/licenses /etc/licenses
license -r
This will allow the other machines to take the licensing information from node 1 and copy it to their own local database. It is possible to automate this process by using a shell script.
Step 3: Configuring the Network
This must be done on all machines
We must tell QNX about our new network and to do this we need to add the new machine's details into every /etc/config/netmap. If the new card has a node address of:
02DF1E 132540
our new file will look like this:
1	1	02DF1E012354
2	1	02DF1E013258
3	1	02DF1E132540
NOTE:There is a carriage return after the last line.
This must be done on each machine in the network. If you have 20 nodes you need only manually alter the first and last and copy the rest from node 1:
cp //1/etc/config/netmap /etc/config/netmap
This process could be included as part of the shell script that updates the licenses.
Step 4: Starting the Network Software
This is the same as step 4 in the previous example, except we are only starting the drivers on the new machine as the rest are already running them.
Adding a Second Network
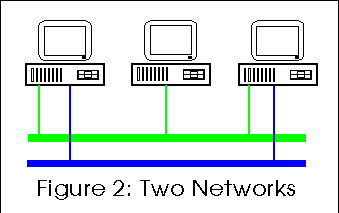
Taking the three node example above we will expand it to include a second network. This will give us betterf network performance and fault tolerant networking. We are aiming for something that looks like figure 2:
We are installing a second Ethernet but you could use any network type, just as long as you start the correct QNX device driver for it. Out two new Ethernet cards have the address:
0ACF12079685
0ACF12789543
Step 1: Install the Cards
Power off the machines and install the network adapters in nodes 1 and 3, taking note of the settings of the card just in case we need to give more infomration to the QNX device driver later.
Step 2: Starting the Drivers
Net is already runnig so all we need to do is start the drivers for the second network.
Net.ether1000 -l 2 -vv &
Here we are telling QNX that this is the driver for the second network attached to our system using the option -l 2. We've also asked QNX to give us more infomration about the card and driver startup than it normally would using -vv.
Step 3: Configuring Netmap
This MUST be done on nodes 1 and 3
All we have to do is to describe our network setup to QNX and it should be ready to go. This is in the /etc/config/netmap file and we'll need to change it so that it looks like this:
1	1	02DF1E012354
1	2	0ACF12079685
2	1	02DF1E013258
3	1	02DF1E132540
3	2	0ACF12789543
Once the file has been saved force the changes to take effect by issuing the command:
netmap -f
Step 4: Testing the New Connection
To test the new connection we just unplug the cable on the original network and enter the following command from node 3:
sin -n 1
It should behave just the same as the test we did when we installed the first network.
Fault Finding
This section explains and deals with common problems encountered whilst setting up a QNX network.
Licenses
If there is no conection it may be possible that insufficient licenses have been installed on a machine. Generally, the rule is that every QNX machine on a network must contain a copy of ALL licenses on that network. The way to check this is to type:
sin info
and examine the nodes column. The number here should equal the number of nodes you have on your network. If it doesn't you will need to re-install the licenses from floppy disk or from another node, using the license command.
If you have a machine that has been installed as node 1 and you change it to node 5 and then install 4 extra licenses they won't be recognised. You should install the extra licenses first and then change the node number.
At any time the licinfo command will tell you what each node thinks is going on with the licenses available, how many it knows about, how many it thinks are being used and by which node.
Cabling
Network Cards
Generally, just starting the driver will be enough for QNX to auto-detect the hardware. Sometimes this isn't the case so use the command line options to the device driver to specify as much information about the card as you can. The -v option is especially useful in obtaining more information about what the device driver is doing and what it has found. You can specify up to 4 -v's on a command line
QNX supports a wide range of network adaptors and more are being added. Please contact your dealer for more information.
Network Diagnostics
Most of the information you will ever need to know about network problems can be found by using netinfo. Netinfo displays the contents of Net's in-memory event log. Th eoutput will be in the following format:
Date      Net  (Nid|Status)   Code   Description
16:16:37   0   Logical 10     (35)   NET logical node not in netmap
Explanation of fields
- Timestamp of the event. The format of this can be changed with the -f option to netinfo.
- Which logical network the error or event occurred on. In this example 0 is an invalid logical network because the error occurred at a higher level, inside the Network Manager.
- Information associated with the event, maybe a logical or physical Node ID or a status number. Generally, it is the most appropriate piece of information for the event.
- A unique error code. Ranges are reserved currently:
- 1-99 Net
- 100-199 Net.arcnet
- 200-299 Net.ether8003
- 400-499 Net.ether503
- 500-599 Net.ether1000
- 600-699 Net.tr164a
- 700-799 Net.fd
- 800-899 Net.tr164a
- 1000-1099 Net.star
- 1100-1199 Net.ether2100
- 1200-1299 Net.wavelan
- 1300-1399 Net.fddidfe
- 1400-1499 Net.ether9000
- 1500-1499 Net.ether21x40
- This is a short textual description of the event. Use netinfo -a to see all posible codes.
Installing a PCMCIA Device for QNX
Start the driver
The pcmciatrap utility can be very useful in determining which PCMCIA driver to start and how to start it.
pcmciatrap - Autodetect PCMCIA adapter and optionally start correct driver.

pcmciatrap  [options] [query]   Print command line necessary to start driver.
pcmciatrap  [options] start     Start driver.
Options:
 -q      Quiet output
 -v      Verbose output for debugging.
Entering pcmciatrap start will start the appropriate PCMCIA driver for your system.
Once this has been done you can use the pin command to view PCMCIA statistics.
pin - display information about PCMCIA devices and servers (QNX)

pin [options]...  [command]

Options:
 -n node           Information about server on this node
 -s socket         Information about this socket only (1 based)

Commands:
 status            Show status of each socket (default)
 resources         Port, irq and memory resources
 config            Attempt to make configuration file entries
 cis               Decode CIS on card
 clear             Clear all resource tables on server
 file              Cause server to reread configuration file
For example pin will display the number of slots you have and details of any devices currently inserted. It should look something like this:
Sock  Win  Type    Flags            PID    Base   Size   IRQ  Base   Size  DMA
1          Empty   ----MF---------- None
2          Empty   ----MF---------- None
Configuring the Resources Required
The next step is to tell QNX which resources can be safely used by the inserted cards. The PCMCIA Manager attempts to allocate resources to the cards as they are inserted and we need to nake sure that it won't allocate resources that are required elsewhere. To do this we need to edit the /etc/config/pcmcia.node file. The file on my system looks like this:
[resources]
memory = 0xd0000-0xd1fff
ports = 0x280-0x29f, 0x300-0x33f
rports = 0x2e8+8, 0x3e8+8, 0x170+8, 0x376+2
irqs = 12,7,5,3
- [resources]
- This tells the PCMCIA Manager that we are definig the resource set that it may use. This is obligatory.
- memory = 0xd0000-0xd1fff
- This allocates a range of memory into which the PCMCIA Manager can put inserted cards.
- ports = 0x280-0x29f, 0x300-0x33f
- These are the I/O ports that the cards can use. The PCMCIA Manager uses the range on a best-fit, first-come first-served basis. If you have insufficient ports then not all the devices will be able to start.
- rports = 0x2e8+8, 0x3e8+8 0x170+8 0x376+2
- This represents the range of ports that the PCMCIA Manager MUST not use.
- irqs = 12,7,5,3
- The valid range of interrupts that can be assigned to cards as they are inserted.
Configure Cards
Before QNX can auto-detect and configure the cards you must tell it about them. Take a look at the /etc/config/pcmcia.cards file for a list of all those currently supported. Entries follow the same format as the pin configoutput:
; socket 1
[device]
manufacturer = "Socket Communications Inc"
product = "Socket EA PCMCIA LAN Adapter Revision E"
info1 = "Ethernet ID 00C01B006B0D"
regbase = 0x10000
config = 0x01, 0x0601, irq any, io any+32 (width=16)
config = 0x03, 0x0601, irq any, io 0x2a0-0x2bf (width=16)
config = 0x05, 0x0601, irq any, io 0x2c0-0x2df (width=16)
config = 0x07, 0x0601, irq any, io 0x2e0-0x2ff (width=16)
config = 0x09, 0x0601, irq any, io 0x300-0x31f (width=16)
config = 0x0b, 0x0601, irq any, io 0x320-0x33f (width=16)
config = 0x0d, 0x0601, irq any, io 0x340-0x35f (width=16)
config = 0x0f, 0x0601, irq any, io 0x360-0x37f (width=16)
register = 0, 0x40, 0x40     ; level mode interrupts
Any lines that begin with '#' or ';' are treated as comments and ignored.
- [device]
- Tells the PCMCIA Manager that we are specifying a device description.
- manufacturer = "Socket Communications Inc"
- The Manufacturers ID is used by the PCMCIA Manager to find the best match to the information retrieved from the Card Information Structure (CIS) when the card is inserted. This can include wildcards like * ?.
- product = "Socket EA PCMCIA LAN Adapter Revision E"
- This is the product specifier as designated by the card manufacturer. When more than one card from a manufacturer is inserted the product line will be read to determine which is which. Wildcards are acceptable in this field.
- info1 = "Ethernet ID 00C01B006B0D"
- There are two optional info lines info1 and info2 which contain manufacturer specific information about the card.
- regbase = 0x10000
- This line tells the server where in the card register space the configuration registers reside. By default it will be 0x100.
- config = 0x01, 0x0601, irq any, io any+32 (width=16)
config = 0x03, 0x0601, irq any, io 0x2a0-0x2bf (width=16)
config = 0x05, 0x0601, irq any, io 0x2c0-0x2df (width=16)
config = 0x07, 0x0601, irq any, io 0x2e0-0x2ff (width=16)
config = 0x09, 0x0601, irq any, io 0x300-0x31f (width=16)
config = 0x0b, 0x0601, irq any, io 0x320-0x33f (width=16)
config = 0x0d, 0x0601, irq any, io 0x340-0x35f (width=16)
config = 0x0f, 0x0601, irq any, io 0x360-0x37f (width=16) - This is broken down into the following fields:
- index
- This is a numeric constant that indicates the configuration index value to be written to the card configuration register.
- type
- The type of card that is inserted. High order byte is generic and the low order byte is specific.
- 0x0201 Serial/ modem devices with 8250/16450 devices
- 0x0301 PC Parallel ports
- 0x0401 ATA Hard Disk
- 0x0501 VGA Adaptor
- 0x0601 NE2000 compatible network card
- 0x0602 NCR Wavelan Card
- 0x8001 Adaptec T340 SCSI Adaptor (NCR53C400)
- 0x8101 New Media .WAVJammer
- resource
- Specifies what resources this configuration requires. POssible values are:
- irq
- Specifies the IRQ to assign to the card. Multiple values can be used by specifying irq | irq | irq and any of those entered may be used.
- io
- The IO port range that may be used.The following options are valied:
- start - end
- start + length
- ANY + length
- width=8
- width=16
- offset=
offset is not currently supported - mem
to specify a 4K page aligned memory range.
NOTE: You will not ordinarily have to create one of these descriptions by hand.
The /etc/config/pcmcia.cards file contains an up to date list of all descriptions that are known to currently work with QNX. If your card does not appear in this file it can be added by doing the following:
	pin config > /tmp/pin.cfg
	cat /tmp/pin.cfg >> /etc/config/pcmcia.cards
Once this has been done slay the PCMCIA Manager and re-start it and issue the pin command. You should now see something like this:
Sock  Win  Type    Flags            PID    Base   Size   IRQ  Base   Size  DMA
1     0    NE2000  C---I-+--------W None   0x280  32     5
2          Empty   ----MF---------- None
Take a note of these settings because you will need them when starting the driver for the card.
Start the Driver
All that remains is for your to start the appropriate device driver to talk to your hardware. QNX allows for the dynamic starting and stopping of device drivers from the command line. So in our example above with the NE2000 compatible Network card you would enter:
Net.ether1000 -l2 -i5 -p 280 &
Automatically Launching the Driver when the Card is Inserted
![]() Under Construction
Under Construction ![]()
For more details please see the PcmciaLaunch documentation.